Now is your chance to unlock the secrets to heel hook success, as Gordon “The King” Ryan shows you how anyone can become a leg locker with these systems and techniques he has been using through his unparalleled rise in submission grappling
Gordon “The King” Ryan Reveals The Leg Locking Secrets That He Broke Onto The Scene And Continues To Dominate With, As He Teaches You How Anyone Can Systematically Attack The Lower Body In This 8-Volume Masterclass
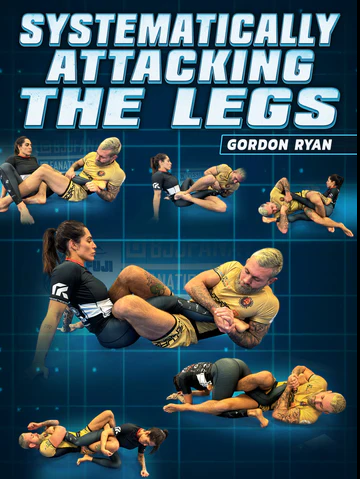
Learn how to attack and defend in leg entanglements like irimi ashi garami, cross ashi, 50/50, outside ashi, and more!
In each position, Gordon breaks down exactly what you need to do, step-by-step, for success in staying safe as you apply seriously powerful submission holds
Understand the best ways to apply and break with inside and outside heel hooks, and why you must have both to become a complete leg locker
See actual rolling footage from the gym as Gordon puts this system into action and then breaks down exactly what he was doing so you can see the techniques in motion
Know more. Win more.
Volume 1
CHAPTER TITLE
START TIME
Intro To Leg Locks
0:00 – 3:41
Overview
3:41 – 6:41
Theory
6:41 – 8:37
Importance Of Inside And Outside Heelhooks
8:37 – 11:25
Battle Of Inside Positions
11:25 – 15:05
Irimi And Outside Ashi Garami Strategy
15:05 – 19:32
Cross And Inside Ashi Garami Strategy
19:32 – 24:20
50/50 Strategy
24:20 – 27:54
Mutual Ashi Garami Strategy
27:54 – 29:53
General Escape Directions
29:53 – 34:39
Double Trouble
34:39 – 37:32
Following A Leg
37:32 – 39:24
Switching Legs
39:24 – 41:22
Basic Drills
41:22 – 50:58
Achilles Lock Drill
50:58 – 54:50
Cowboy Drill
54:50 – 58:07
Achilles Lock Concepts
58:07 – 1:02:37
Knee Bar Concepts
1:02:37 – 1:07:34
Toe Hold Concepts
1:07:34 – 1:11:17
Heel Hook Concepts
1:11:17 +
Volume 2
CHAPTER TITLE
START TIME
Intro To Irimi Ashi Garami
0:00 – 1:53
Setting An Irimi Ashi Garami
1:53 – 5:21
Stress Test
5:21 – 10:28
Basic Achilles Lock
10:28 – 14:18
Countering A Basic Extraction
14:18 – 16:48
Countering Forward Pressure With Ashi Garami And Elbow Position
16:48 – 19:18
Countering Forward Pressure With Post Ashi
19:18 – 22:05
Countering Forward Pressure With Belly Down Achilles
22:05 – 25:27
Switching To Butterfly Ashi
25:27 – 29:36
Butterfly Ashi To Other Leg Entanglements
29:36 – 34:49
Achilles Heel Hook Dillemma
34:49 – 38:22
Finishing Mechanics
38:22 – 45:32
Stress Test
45:32 – 46:54
Countering A Heel Slip With High Hands
46:54 – 48:28
Countering A Heel Slip With A Roll Through
48:28 – 52:34
Switching To Outside Ashi
52:34 – 54:34
Single Roll Theory
54:34 – 59:41
Countering A Post Knee
59:41 – 1:02:22
Figure 4 Switch If They Refuse To Roll
1:02:22 – 1:05:13
Breaking Mechanics
1:05:13 – 1:07:52
Outside Ashi Breaking Mechanics
1:07:52 +
Volume 3
CHAPTER TITLE
START TIME
Intro To Outside Ashi
0:00 – 0:56
Irimi Ashi Garami Vs Outside Ashi Garami
0:56 – 5:04
Countering A High Leg
5:04 – 8:07
Countering A High Leg With Wrist To Wrist Toe Hold
8:07 – 10:28
Controlling Outside Ashi And Denying Back Exposure